Feeds:
Posts
Comments

lazybird has gone vegan.

lazybird vegan cheesecake

ok, well…we haven’t become vegans (dang you delicious cheese!) but we are equal opportunity and can now confidently bake for vegans.

this challenge started with the offer to try tackling some vegan baked goods for a friend’s recent baby shower. i hit the internets right away and ordered two popular and highly recommended cookbooks: “flying apron’s gluten-free & vegan baking book,” by jennifer katzinger and “the joy of vegan baking,” by colleen patrick-goudreau. i read and read, and was inspired to order more books on veganism, nutrition, organics, factory farms etc, etc…and made a pretty significant life change….i gave up pop (or soda, or coke, or whatever you want to call it) i also feel a lot worse about milk, butter, eggs and meat….but….well…i gave up pop….lets take it one step at a time.

long story short, this challenge…was not so challenging (after i was able to track down egg replacer, that is). if you have a whole foods or sprouts or a specialty market nearby…you’re one step closer to whipping up a “cheese”cake of your own.

ingredients:
crust:
4 cups pretzels
1/2 cup melted non-dairy butter (i used earth balance)
3 tablespoons peanut butter
1/2 cup sugar

“cheese”cake (adapted from “the joy of vegan baking,” by colleen patrick-goudreau):
6 teaspoons Ener-G Egg Replacer
1/2 cup water
1 cup nondairy semisweet chocolate chips
24 ounces non-dairy cream cheese, room temperature (i used the highly recommended tofutti)
3/4 cup organic sugar
1/2 teaspoon vanilla

chocolate ganache:
1/2 cup soy creamer
12 oz dairy free chocolate chips

preheat your oven to 350º.

for your crust… combine pretzels, melted butter, peanut butter and sugar together in your food processor till finely chopped.

prepare your springform pan….generously butter the bottoms and side of a 9in springform pan. place a piece of parchment paper, cut to fit, on the bottom of the pan and butter paper as well. coat the bottom of the pan with pretzel crumb mixture. coat sides of your pan as well, about an inch up. set aside.

in a medium size bowl whip together the egg replacer and water till you’ve achieved a thick cream mixture. your mixture will have doubled in size and become white and almost frothy. set aside.

in a heat safe bowl over a saucepan of simmering water, melt your chocolate chips. remove from heat and let cool to room temperature – still give it a stir here and there so it won’t harden back up.

in a large bowl, or your stand mixer beat together “egg” mixture, “cream cheese” and sugar (hah, like all the quotations?!) till smooth. pour in melted chocolate and vanilla and mix till thoroughly blended. (note: if your cream cheese mixture is colder than your chocolate, mixing the two might result in a chocolate chip cheesecake instead of a smooth, blended chocolate….i mean….it could be considered a happy accident, but if you disagree…you’ve been warned)

pour mixture into prepared crust/springform pan.

bake at 350º for 50 minutes. at this point your cheesecake should be set along the edges, but jiggle slightly in the middle. once the timer rings, turn your oven off and let your cheesecake stay put for another 50 minutes. do not open up the oven door during this whole process…lest you risk cheesecake cracks…dum dum dummm. remove from oven and transfer to wire rack to let cool to room temperature. at this point, run a knife around the edge of your springform pan to separate the pan from the cake – this also helps ward off cracks. once your cake has cooled, wrap up tightly and store in fridge overnight.

next morning, or at least a couple hours prior to serving the cheesecake, make your ganache. pour chocolate chips into a medium-sized heat safe bowl and set aside. in a small saucepan heat soy creamer over medium heat till bubbles start forming around the edges of the pan. remove from heat and pour over chocolate chips. let sit for five minutes. slowly begin to stir your mixture, being careful not to incorporate too much air. once your chocolate has melted and you have a creamy texture, set aside and let cool till your ganache has thickened enough to pour out and spread over cheesecake – your ganache shouldn’t be runny, you should need to use either gravity (in tilting your cake back and forth) or a knife to spread out over cake.

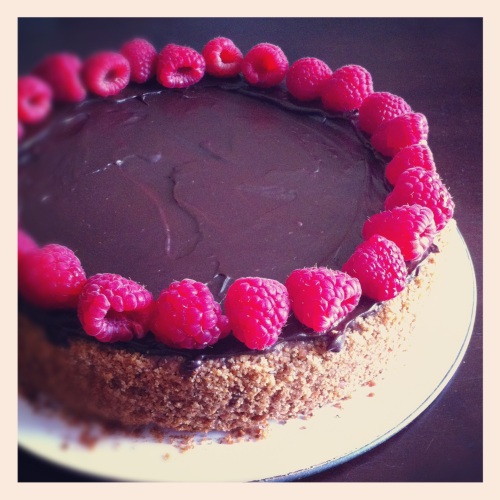
add a garnish if you like.…i liked raspberries.

return to fridge till ready to serve.

as a non-vegan, i was nervous about the results. ESPECIALLY because, you can’t really take a sneak taste of a cheesecake….unless you go all cliff huxtable and cover up the bite with the ganache….shoot! why didn’t i think of that?!

i was relieved when the guest of honor took a bite and confirmed success…and even happier when all the non-vegans took to it with pleasure as well. the biggest success, however, was later that evening when i tricked a vegan-dessert-DETESTER into eating a slice (didn’t tell him it was vegan) and got a high-five for its deliciousness. after he demolished it and i told him of my trickery, i received another high-five for making the first vegan dessert he had tried and enjoyed.

if you’ve made it this far…i’m assuming you are vegan, or are at least toying with the idea. i promise, if you’re a cheesecake fan, this one is worth trying…and even tricking your friends into eating.

enjoy!

-L

i’ve been in the mood for L’s scones ALL WEEK! the cinnamon ones to be exact. so, off to the store i went with my fingers crossed in hopes that i would find cinnamon chips. much to my dismay, the store didn’t carry them. i tried one other store and drat, no cinna chips there either. blah. what am i supposed to do now? i decided to grab some white chocolate chips and then maybe i’d add some ground cinnamon instead. but how much cinnamon? is that even a good idea?  time to chat up L and we decide that one could probably add ground cinnamon and it would be fine, but then she suggested making cranberry scones instead. hearing her suggest that made me immediately think about the  zesty oatmeal cookies recipe we posted a little while back and since i had already purchased the white chocolate and had craisins at my house, the cinnamon scones were out and the zesty scones were in. brilliant! and that’s how these delicious little scones came to be. that being said, this recipe is quite the rip off of L’s cinnamon scones, but let this be a lesson in just how easy it is to alter a recipe. after you’ve made these little crowd pleasers maybe you should dust off an old recipe to breath new life into with a few alterations. isn’t baking great?

2 cups all-purpose flour
1 tablespoon baking powder
3 tablespoons sugar
1/2 teaspoon salt
5 tablespoons chilled, unsalted butter – cut into 5 cubes
1/2 cup white chocolate chips
1/2 cup craisins
1 teaspoon orange extract
1 cup heavy cream

preheat your oven to 425.

sift your flour, baking powder, sugar and salt together in a large bowl. cut in cubes of butter with a pastry blender until the flour mixture resembles course meal with butter lumps about the size of peas. stir in white chocolate chips and craisins.

make a well in your flour mixture and pour in heavy cream, orange extract and mix together with a fork or a rubber spatula until dough forms. transfer dough to a lightly floured surface and knead a few more times making sure you get in all the crumbs that want to stay behind in the bowl.

i lightly floured an 8×8 pan and patted the dough into the pan. first i cut the dough into 9 squares and then cut the squares diagonally so i would end up with 18 small scones. i then turned the pan over onto an ungreased baking sheet and separated the triangles for baking. the other option would be to roll the dough out and use biscuit cutters to make the scones….but that seemed a little too time intensive.

bake for 10-15 minutes until tops are golden brown. transfer to cooling rack.

This slideshow requires JavaScript.

glaze:
a few dashes of cinnamon
1/2 cup of powdered sugar
1 tablespoon of water

once your scones have cooled, put the rack on top of a paper towel and drizzle or brush your glaze on top each scone. let set before stacking for storage or presentation.

voila!

love,
B

these might be hands down my most fave dessert of all time. that’s a bold statement. i know. but i love coconut and i love vanilla. maybe even more than i do chocolate. that may be an even bolder statement. i’m really learning a lot about myself right here in this very moment. :) so, why on earth have i not made macaroons or anything with coconut for that matter for this blog before? that’s easy. because L doesn’t like coconut. as in she hates it. haha and now that we live across the country from one another i’m less sensitive to her likes and dislikes.  j/k. but, now i don’t feel guilty making them! love you L. what have i also learned here with this recipe? that i’m the laziest bird around. this is the simplest recipe ever, so enjoy.

this recipe is adapted from a recipe i found on allrecipes.com

ingredients

1 1/3 cups all-purpose flour
11 cups flaked coconut
1/2 teaspoon salt
2 (14 ounce) cans sweetened condensed milk
1 tablespoon and 1 teaspoon vanilla paste

equipment

large mixing bowl
wooden spoon
cookie sheets
table spoon from scooping

preheat your oven to 350 degrees F.

mix it up. in your large mixing bowl add the flour, coconut and salt. with your wooden spoon mix contents while adding the sweetened condensed milk and vanilla paste until everything is well blended.

scoop it up. using your tablespoon, scoop up the dough and plop it down on the cookie sheet making rows. place in the oven and cook for 15-20 minutes or until golden brown. coconut is best toasted anyway right? once done in the oven place on cooling racks and while they’re still warm, be sure to try a few. these will also taste great in the days to come!

enjoy and share the love!

love,
b

p.s. thanks for your patience in mine and L’s absence. life gets tricky sometimes, but we always seem to bounce back and we’re glad to be back!

grasshopper brownies

and….we’re back. well, we’re trying to be anyways.

i know it’s been a while, but life got a little hectic. a resolution of mine in the new year is to get back to my hobbies that have all been left on a back burner for the past few months. i realize our last post made it seem as though we were done blogging….but that’s not true. we’re still here and we may be separated but by no means does that mean we’re done baking and blogging.

birthday seasons always seem to bring me back to my senses. thanks to ricky….i got back into the kitchen to combine two of my favorite flavors….chocolate and mint. maybe it’s cause i haven’t baked in so long…..or maybe these little buddies were truly inspiring…but these brownies quickly moved into the top 5 ranking as far as lazy bird treats go. i say they are worth your time…..i say they were so good i had to set aside weight watchers points (6 points, btw) to eat one every day until they were gone….but that’s just me.

(adapted from the adorable, love and olive oil)
ingredients:

yields 32 brownies
(brownie)
3/4 cups flour
1/2 teaspoon salt
1 tablespoon dark unsweetened cocoa powder
5 ounces dark chocolate, coarsely chopped
1/2 cup unsalted butter, cut into 1 inch cubes
3/4 cups sugar
1/4 cup firmly packed brown sugar
3 large eggs, at room temperature
1 teaspoon vanilla extract

(buttercream)
1 1/2 cup powdered sugar
1/2 cup unsalted butter
2 tablespoons creme de menthe
1 teaspoon peppermint extract
1 tablespoon milk

(chocolate glaze)
6 ounces dark chocolate, coarsely chopped
1 teaspoon light corn syrup
1/2 cup unsalted butter, softened, cut into cubes

preheat your oven to 325º

very generously butter the bottoms and sides of a 9 x 13 inch glass pan. line the bottom with parchment paper (allowing excess paper on either side to use as leverage when removing the brownies), and butter the parchment paper as well. set aside

whisk together flour, salt and cocoa powder in a medium sized bowl. set aside.

using a double boiler (or something resembling one, in my case) melt your chocolate and butter until smooth and glossy. turn off your heat source but leave your boiler in place and add in your sugars (white and brown). whisk until sugars are completely combined. remove from heat and let mixture come to room temperature.

add in eggs and whisk until just combined. add in vanilla and mix till combined. (overbeating at this stage will cause a cakey brownie)

fold in your flour/cocoa/salt mixture until the wet ingredients have absorbed the dry.

pour your batter into the glass pan you’ve already prepared. bake for 12-15 minutes, rotating halfway through baking time. try your hardest not to overbake these little buddies. test your brownies about a minute or two before your bake time is complete and if your toothpick comes out with a few more flecks of brownie than you’re comfortable with…don’t fret. fight your instincts and take them out a smidge early. they will continue to bake through on your counter as they cool down and taking them out early ensures a yummy gooey brownie. mmmmmm.

while your brownies are cooling lets get the buttercream going.

in your stand mixer beat your butter and powdered sugar on a medium-ish speed till it’s nice and fluffy. add in creme de menthe, peppermint extract, and milk and continue beating till mixed in. if you need to add in more sugar for consistency sake…feel free.

spread the buttercream over the brownies – smoothing with a rubber spatula and transfer to fridge for some chillin time. 45 minutes should do the trick.

time for the glaze. double broiler time again. combine your chocolate, corn syrup, and butter in a heat safe bowl over a saucepan of simmering water. whisk it up until your chocolate is silky smooth. remove from heat and whisk like crazy for about a minute so release excess heat.

pour melted chocolate over your chilled brownies and butter cream. spread the glaze, with an offset spatula to create an even layer from edge to edge of your brownies. transfer back to fridge for about an hour or until the glaze hardens.

remove pan from fridge and wait about 15 minutes for your glaze to soften slightly. remove the brownies from their pan by gently pulling up on the excess parchment paper. (this is why you went a little nuts with the butter in the first place) cut brownies into squares using a warm knife. for nice clean cuts, run your knife under hot water – dry off, make the cut, and repeat.

serve immediately. brownies are best cold…mmmm…memories.

enjoy and thanks for waiting so patiently :)

– L

happy/dumb

beth and i have always said…we met each other at the wrong time.

we say this because we only wish we could have met each other sooner. our lives just didn’t line up quickly enough and it seems as soon as they did…they will be separated again.

i moved from iowa to texas four years ago. i started working for Fossil and met bethany on my first day…she even drove me to my welcome lunch and we stopped at starbucks before heading back to work (i mean, if that didn’t scream match made in heaven, i don’t know what did). that was four years ago (almost to the day) on september 10th. our bosses biggest mistake AND best idea was sitting us next to each other. it was their biggest mistake because we talked…all. day. long. i mean…don’t get me wrong, we were still super productive, but i guess no on else could talk so much and still get so much done, so i’ll just say we set a bad example. it was their best idea…because we got to talking about baking together….and one fateful night of baking butter cookies and gingerbread men eventually evolved into lazybird. and we all know it’s our coworkers that get the biggest reward of our lazybird efforts – the taste testing.

however, today….beth and her husband stephen are in a packed up car…headed to madison, wisconsin. we have labeled this situation “happy/dumb”

let me start with the dumb:

it’s dumb that i moved from the midwest to the south….and now you’re moving from the south to the midwest. someone flip flopped our schedules and i don’t appreciate it.

it’s dumb that i won’t see you every day:
i. will. miss. your. face. we have been extra spoiled cause we’re not only friends who bake together and play together…we’re also friends who work together – go to the break room together in the morning to get water and to corporate services in the afternoon just to take a moment away from the computer and chat about the craziness of our day so far…friends who can take hobby lobby lunch breaks or indian food lunch breaks….OR pedicure lunch breaks (dang, who’s gonna get lunch peddies with me?!) friends who, lets be honest, grew the closest when we were cube neighbors….and were then definitely separated from each other cause of our chattiness. friends who get excited together about the smallest things and talk so fast and finish each other’s sentences, leaving our other coworkers just laughing at the pace and/or subject of our banter.

it’s dumb that you come as a packaged deal:
you leaving = my boss leaving (cause my boss is your husband). i’ve been so blessed to have had a boss that supported me and challenged me and who’s goal was for my growth…his shoes will be impossible to fill. (sorry future boss, it’s true….you have a lot to live up to) and thanks to you…he’s been a boss who could handle my occasional breakdowns….since my emotions mirror yours.

it’s dumb that my rollerblades will gather dust:
it’s so easy to talk you into adventures (turbo kick, rock climbing, skating). we are not compatible in everything….but we are adventure compatible…and i can count on you to try new things…hence lazy bird skate club. i mean, who even owns roller blades these days besides me and you. who’s gonna roller blade with me?!…AND turn around to chase down the ice cream trucks, without hesitation or shame of being the only adults (in roller blades) surrounded by children in line for a bomb pop.

despite all the dumb….i am overflowing with happiness for you guys.

i’m so happy that this opportunity has presented itself.

i’m so happy for stephen’s new job and so proud of him….he’s so talented and deserving. even though i will miss him as a manager, i want the very best for him and you.

i’m so happy that y’all have the freedom to move…to adventure…to experience a new setting.

i’m happy that you’ll still be close to family and i can only imagine all the holiday get togethers that will ensue.

i’m so happy that y’all found a house…and it’s lovely…and the view is beautiful. you’re such an adult in madison.

i’m so happy that you’ll get to enjoy all the wonderful traits of the midwest. oh beth, you’re gonna love the natives….no more polite, soft spoken, i’ll only say what’s proper….midwest people are matter of fact, honest, blunt even….SO much more your style :)

i’m so happy you’ll experience seasons, and beautiful ones at that….yes there will be snow….but it will be quiet and serene….and you’ll have an excuse to bundle up and knit and make quilts. you’ll get fresh springs and crisp falls and summer days that will last forever. AND the temperature actually breaks with the sunset…ok…maybe i’m getting jealous now and if i keep talking i’ll have to move this up to the dumb category.

i’m happy that someday when you have kids…they are gonna talk like me! “you guys”, and “pop” and drawn out a’s and o’s. hah…it’s gonna be great!

and speaking of kiddos…i’m so happy that yall are at a place where a family is within reach. (don’t worry, i didn’t say it was happening immediately) you’re gonna be the best mom. oh man…and the most dramatic preggo….(it’s dumb that i don’t get to witness that, for my own entertainment)

so…who knows, maybe i attack lazybird from the south and you get it goin in the midwest and someday our paths will merge again. what i DO know…is that even though i got you for a mere four years….my life has been forever blessed by your friendship and moving across the country does NOT affect how much i love you or how important you are to me. just because i won’t see you everyday, doesn’t mean you wont be a part of my everyday life.

we laugh about all the things we aren’t compatible in….but to tell you the truth, it’s been our differences that have made us fit together so well. i needed you to take lessons in confidence and standing up for myself. i need you for your ability to small talk and ask engaging questions…for your interest in everyone and their life story. i need you for your structure, your planning and for your big dreams. and maybe, just maybe….you needed a little dose of my laid back, go with the flow. (just sayin)

happy/dumb

i love you SO much. BEST wishes in your new home! wisconsin….you better treat her right!

-L

lemon crinkle cookie

one year ago: corndogs y’all

oh, it’s been a while. this i know. it’s been a pretty hectic month. between the two of us, there have been trips, house huntings, happy news and dumb news. i’m also still a “cupcake explorer” testing out vanilla cupcakes on a lip-sealed-till-it’s-discovered mission. so while my coworkers have been enjoying the cakes of my labor, y’all have been kept in the dark (till the day the recipe is cracked). so with the month of august…came a whole lot of crazy…but at the end of the day, the baking keeps me sane….so it’s high time we get back on track here.

it’s birthday season here at work, so i have lots of excuses to bake away. this week’s request: anything lemon.

i found this cookie on pinterest months ago and have been dying to make it….so thanks to tracy’s 39th birthday and his love for anything lemon, i had the perfect excuse.

lemon crinkle cookies
(adapted from Lauren Brennan’s award winning recipe)

ingredients:
1/2 cup unsalted butter, softened
1 cup sugar
1/2 teaspoon vanilla extract
1 large egg
1 teaspoon lemon zest
1 tablespoon fresh squeezed lemon juice
1/4 teaspoon salt
1/4 teaspoon baking powder
1/8 teaspoon baking soda
1 1/2 cup all purpose flour
1/2 cup powdered sugar

preheat your oven to 350º. line three cookie sheets with parchment paper OR lightly grease pans and set aside.

in your mixer, cream together butter and sugar on medium-high till fluffy. mix in vanilla, zest, lemon juice and egg. scrape down your bowl and add in salt, baking powder, baking soda and flour. mix till all ingredients are combined.

measure out powdered sugar onto a plate. roll your dough into small (tablespoon sized) balls and roll in powdered sugar, covering the whole surface.

place on your prepared cookie sheet about two inches apart. bake at 350º for about 9 minutes or until the tops of your cookies begin to show small cracks.

remove from oven and let your cookies cool on the pan for about 5 minutes and then transfer to cooling rack to cool to room temp. or just eat them all right away, your call. you can also dust with more powdered sugar if you like.

and the result…..holy. moly. these cookies were delish. so light and fresh, with the perfect amount of zest to sweet. if you’re a fan of citrus…i would highly recommend these cookies. come to think of it….they would probably be just as tasty with some orange or lime as a substitute to the lemon.

you should absolutely squeeze in a batch or two of these cookies as the summer comes to a close.

enjoy!

-L

“these are stupid good”

since july is coming to an end, i’m considering this post to be a little christmas in july. but, the only thing that would even qualify this as a christmas recipe is the fact that there are dried cranberries in these cookies and as i was making them last night i thought that these would make a great addition to my thanksgiving/christmas holiday dessert playlist! so, thank you ryan, our newest team member at work, for the suggestion of this brilliant little cookie. who knew i’d be into such a zesty morsel. but, i guess you never really know until you try!

ingredients

1 cup butter

1 cup brown sugar

1/2 cup white sugar

2 eggs

1.5 teaspoons vanilla extract

1 T grated orange zest

1 teaspoon orange extract

1.5 cups all-purpose flour

1 teaspoon baking soda

1 teaspoon ground cinnamon

3 cups rolled oats

1 cup dried cranberries

11.5 oz. bag of white chocolate chips

preheat your oven to 350 degrees. baking time is 10-12 minutes or until golden.

let’s get this zesty party started! in your mixer’s bowl blend together softened butter and sugars until smooth and creamy. add your eggs one at a time mixing well in between. follow that up with the extracts and the zest mixing until well blended. add your flour and baking soda, again blending together well. follow that up with the oats and the chocolate chips. i really just threw in the entire bag of chips, because let’s be honest what’s the fun in not doing that.

place dough in dollops (hehe) on your cookie sheets, well spaced out and bake for 10-12 minutes or until golden @ 350 degrees. once baked, set them out for two minutes to cool before carefully placing them on wire cooling racks. and that’s it. quick, simple and quite possibly life changing. i’m just saying!

happy friday

-b

last week one of my favorite foodie (cupcake) bloggers posted about a need for “cupcake explorers.” she’s on a quest to discover the ultimate vanilla cupcake recipe and my interest was immediately sparked.

Over the years, many of you have asked me for the ultimate vanilla cupcake recipe.  Each time – although you couldn’t see it – my face turned the color of the logo below and my heart sunk as I responded, “I don’t have one.”  I’ve been so busy developing unique, funky, off-the-wall cupcake recipes that I never took the time to work on a vanilla cupcake recipe.  I felt like a gymnast who could do a double flip, but had somehow missed learning how to do a cartwheel.  That is changing now!”

As those of you who have been following along on the Cupcake Project Facebook page already know, I recently began a quest for the Ultimate Vanilla Cupcake recipe.  I’ve researched, baked, and baked, and baked, and in the end created what I believe to be the Ultimate Vanilla Cupcake recipe.

I refuse to call my recipe the Ultimate Vanilla Cupcake until it’s been baked by a 50 baker team of testers (Explorers).  If more than 80% of the Explorers agree that it’s the Ultimate Vanilla Cupcake recipe, I will declare it as such (there’s no recipe that everyone can agree on).  If the Explorers don’t love it, I’ll take their comments into consideration, go back to the cupcake tin, and try again.

cupcake project

so after weeding through almost 700 “explorer” submissions, 50 were chosen…and what do you know, lazybird was among those picked!

i’m super pumped to be a part of this group. i have certainly learned…there are just not enough baking hours in the day. with all the books and blogs and shows…there are just too many different recipes floating around…and when you want to find the best, all the resources make it an overwhelming task. that’s why i love this idea….i loved it even if i wasn’t chosen, cause i knew how much work was going into this task. all the baking on stef’s end…and then all the baking done by her explorers would surely be sufficient in claiming the ultimate vanilla cupcake title. BUT being chosen as an explorer is even more exciting…cause anyone who knows me, knows i love a good adventure.

so this week i’ll be baking and having my true blue taste testers put in there two cents….and then i report back. i’m excited to see what comes of this and SO excited to be a part of it.

-L

one year ago: B’s VERY famous gooey butter cake

i’m not gonna lie…as far as i know, i have no french roots….and i really can’t give you a detailed account of what Bastille Day actually is (just a general one that usually ends with a question mark inflection). BUT…what i do know…is that it’s NEVER bad to have an excuse to eat french pastries….so Happy Bastille Day it is!

i decided to merge a couple existing recipes together to whip up these napoleons. if you’re a follower…you remember the toil and trouble that came with learning how to make puff pastry. it’s not difficult….it’s just specific….and takes patience, time and cold temperatures. (the latter being laughable considering the current dallas heat wave we’re in the middle of….but i went for it anyways)

someday i promise i’ll document the puff pastry process in photos…cause it’s a little hard to imagine without diagrams. (diagrams?! oh man….i’m sure i have lost half of you by now) but all of the trouble aside, one batch of puff pasty goes a long way…and you can freeze it for up to a year. it can make a sweet treat, or a savory side dish

puff pastry
5 cups flour
2 1/2 teaspoons salt
2 cups water
2 cups butter

whisk together your flour and salt. add in water. stir until dough has formed. dough will be a tiny bit on the lumpy side. set aside and let her rest for about 20 minutes.

roll out into a rectangle 1/2 inch thick.

cut up (chilled) butter into squares and put them ALL over the top of the dough, leaving about a 1/2 inch butter-free around the edges of the rectangle. (the butter needs to be chilled….but it’s a fine line…too warm and your dough will absorb it…too cold and it will break through your dough. my handy-dandy pie and pastry bible noted that 60 degrees F is the perfect temperature for your butter…if you want to be that technical….i just guessed it, myself)

after the top of your dough is covered in butter squares, fold it in thirds (like you would a business letter) and roll out again to about 1/2″ thickness. be careful to not let the butter break through the dough or out the sides.

(first fold) turn the dough 90 degrees and roll out again into a rectangle and fold again into thirds. (second fold) it’s important to keep your dough chilled, so between every two folds refrigerate for 30 minutes, covered.

you will repeat this process of rolling out and folding two more times…refrigerating between every two folds until you have folded the dough 6 times. once finished, wrap and refrigerate.

stabilized whipped cream
4 tablespoons powdered sugar
2 teaspoon cornstarch
2 cup heavy whipping cream (divided)
1 teaspoon vanilla extract

(note: i ended up making two batches of this cream, when i probably only needed one…maaaaybeee one and a half?!….however, there’s nothing wrong with left over homemade whipped cream. i’m sure your coffee will agree)

begin by putting your mixing bowl and beaters in the freezer for about 15 minutes.

in a small sauce pan, over low heat, combine powdered sugar, cornstarch and 1 /2 cup whipping cream. whisk together till well blended. bump your heat up to medium and continue whisking till ingredients begin to thicken up and come to a rolling boil. immediately remove from heat and transfer to glass bowl to cool to room temperature – i usually just transfer it back to my liquid measuring cup as you will have to pour it out later on. once mixture is cooled, stir in vanilla and set aside. (if you’re making all parts of your napoleon at once, you might want to start with this step, since it will take a while to cool down. it wont take too long for your whipping cream to whip up, so keep in mind that this mixture needs to be cooled before you start with the next step.)

using your chilled mixer bowl and beaters or whisk attachment, beat the remaining 1 1/2 cup heavy whipping cream at a high speed till you begin to see distinct lines forming in the cream. with the beaters still going at high speed, pour in your cooled, sugar/cream/vanilla mixture. the next part happens pretty quickly, so pay attention. continue beating this mixture till it forms stiff peaks, being careful not to over-beat.

to make napoleons:

preheat your oven to 425°.

remove dough from fridge and cut off a fourth. roll out your dough into a rectangle – about 6″ x 16″ and 1/8 of an inch thick, focusing more on the thickness than the length. once rolled out, prick all over with a fork. sprinkle a cookie sheet with water, shaking off the excess and transfer your dough to the cookie sheet. bake at 425 for 20-25 minutes – dough will be puffed up and golden. transfer to cooling rack. i actually put mine in the fridge to cool which helped when it came time to cut the pastry.

once cooled, gingerly cut your puffed rectangle into three long strips. (it helps to use a wet serrated knife) then cut each strip through the middle leaving you with six strips – three tops, three bottoms. i went ahead and cut mine down to napoleon single serving sizes from there. on the bottom layer slap on some cream and berries (i picked strawberries) or chocolate shavings/sauce?! – whatever you love the most. add the top layer and sprinkle with confectioners sugar. go ahead and add another dollop of whipped cream for good measure, and some more berries while you’re at it. serve immediately – or chill until ready.

it might seem like quite the ordeal from start to finish….but the good news is….once you make a batch of puff pastry….you will have plenty to experiment with. be it cream horns, croissants, or napoleons….there will be enough to go around. AND you will feel oh so accomplished and fancy making anything french!

enjoy!

-L

one year ago: cinnimini rolls

my little birds were skeptical about said blueberries….AND the giant bag of chocolate chips a certain (wonderful) kitchen host had left on the counter definitely didn’t help my “blueberries are delish” argument….but when all was said and done, these muffins were a hit. (and only one of my little birds picked around the blueberries)

if you’re looking for a kid friendly treat, muffins are a great choice. you don’t need a boxed-mix in your cabinet because you probably have all the ingredients you need. as far as equipment, you only need a couple bowls, a spoon and a muffin pan…no mixer required (that would actually hinder this recipe) not only are they super simple….but they are also a super quick treat – we’re talking under and hour quick.

ingredients:
streusel topping:

1/4 cup all-purpose flour
1/4 cup brown sugar (packed)
1/4 teaspoon ground cinnamon
2 tablespoons butter (chilled)

muffins:
3/4 cup milk (room temperature)
1/4 cup vegetable oil
1 large egg (room temperature)
2 cups all-purpose flour (sifted)
1/2 cup granulated sugar
2 teaspoons baking powder
1/2 teaspoon salt
1 cup blueberries (fresh, frozen or drained canned)

preheat your oven to 400°.

prepare your muffin pans. either line with paper baking cups, or spray the bottom of the pan with cooking spray. set aside.

begin with your streusel. (if your cool enough, roll your R’s every time you say streusel….it will make you feel much fancier. i mean, don’t feel bad if you can’t do it….i can’t either….but the girls certainly enjoyed using the extra flair) in a medium bowl, stir your flour, brown sugar and cinnamon together. cut in your chilled butter till your mixture is crumbly, with the largest pieces about pea-size.

tips and tricks:
cut in” is a term used for mixing butter or shortening into your ingredients. you cut the butter with a fork or knife as you stir/mix it with the ingredients. the result is a crumbly mixture instead of a smooth mixture. use chilled butter, so that it keeps its form as you mix. if your butter is softened, it will just mix in smoothly with your ingredients.

in a large bowl, combine flour (sifted), sugar, baking powder and salt. mix all these ingredients together and in the center, make a well.

tips and tricks:
a “well” is exactly what it sounds like, a sunken in area. stir your ingredients together and run your spoon around the edges making high walls. then, in the center of your dry ingredients, scoop out a well.

these are your “dry ingredients” + “well”

in another medium-sized bowl beat together milk, vegetable oil and milk till well blended.

these are your “wet ingredients”

pour your wet ingredients into the well you have created in your dry ingredients. stir your ingredients together just until your dry ingredients have absorbed your wet ingredients. your batter will be lumpy, and that’s the way you want it. about 10-15 times around the bowl should be enough. don’t be tempted to keep going…over-mixing will create a tough or compact muffin.

tips and tricks:
please believe me when i say, don’t over-stir your ingredients. i know it’s hard to look at lumpy ingredients….but i’m telling you, if you stir till it’s smooth…you’re going to get dense muffins. over-stirring causes the gluten in the flour to over-develop and results in a tough muffin, peaked tops or tunnels.

next comes the blueberries. (or strawberries, apples, bananas, chocolate-chips…whatever you prefer)

tips and tricks:
wash your fruit and toss them in flour. this just helps your fruit not to fall to the bottom of your muffin.

gently fold your berries into your batter.

tips and tricks:
the term “fold” is used when you need to stir in an ingredient gently. we have already mixed this batter up as much as we need to, so in this step we fold for two reasons: 1. to avoid over-mixing and 2. to be careful not to squish the berries. fold by scooping your spoon or rubber spatula under all your ingredients and lift up and fold over to the other side of the bowl. continue doing this till your berries are thoroughly mixed in.

spoon your batter into your baking cups, dividing evenly. only fill your cups about 3/4th full. sprinkle your streusel on top, about a tablespoon for each muffin.

bake for 20-25 minutes or until golden brown. you’ll want to transfer your muffins from the pan to a cooling rack after about 3-5 minutes of cooling. removing them from the pan prevents moisture from collecting between the pan and the bottom of your muffin.

serve warm….with butter, if you’re smart like me.

enjoy!

-L